

How To Make Background Transparent In Indesign
Removing a white background from an paradigm in Adobe InDesign is a straightforward and of import process. The aforementioned process tin can be used for backgrounds of any color.
It can be useful when dealing with multiple, overlapping images, or if your prototype needs to be on a page that does non take a white background.
As articulate, middle-catching images make a big divergence to the impact your certificate will have this is something we cover in our InDesign courses.
Permit's have a look at how you remove a white background from an image stride-by-step.
We've washed this two means:
- Video – if you lot prefer post-obit along with someone on a video run into our video beneath.
- Article with screenshots – if you prefer post-obit an article with screenshots simply skip over the video below.
If yous want to see another article on InDesign, view our guide here on how to change the bullet character in paragraphs. or our guide to using tables in InDesign.
1. Remove A Background: YouTube
two. Remove A Groundwork: Step-By-Pace Guide
Allow'due south kick this tutorial off by creating a new Adobe InDesign file.
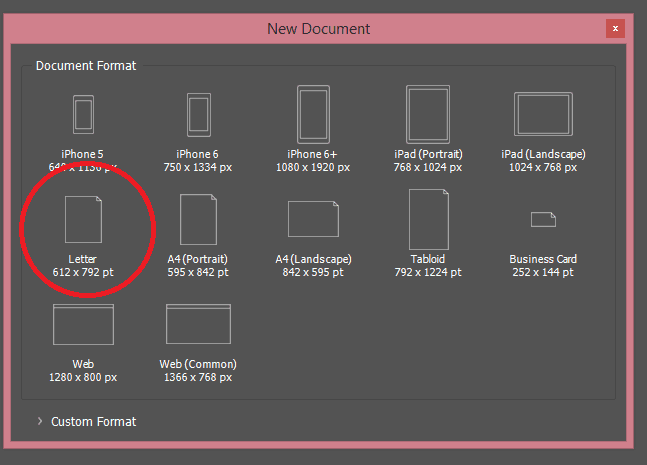
Click on File in the height-left corner of the InDesign window, then click on 'New Document…'.
A window will come up with various Document sizes. Click "Letter".
Now we want to bring our paradigm into InDesign.
To practise this click File and so click 'Place…'.
A Windows Explorer window will come upward.
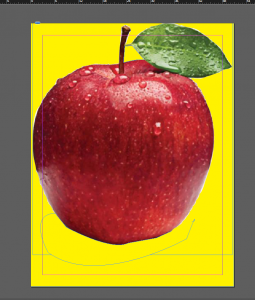
Navigate to the image you wish to apply. For the purpose of this tutorial, I will exist using a picture of an apple.
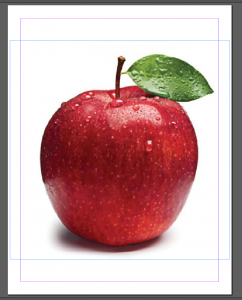
We can't really tell that the apple has a white background – as the whole folio is white.
Let's make a yellow groundwork behind the image of the apple.
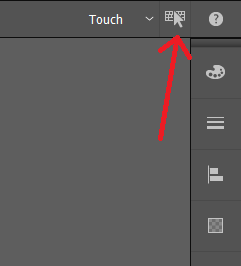
These days, the Default Workspace mode on Adobe InDesign is "Touch" way.
This makes things a fleck more than complicated than they used to exist. We recommend you learn more well-nigh this way and how to employ it best. Y'all can learn more about the Adobe InDesign Workspace equally a whole here. Learning about how to use column breaks will as well help you greatly.
Side by side to the word Touch at the top-right corner of the InDesign window, there is a logo of a keyboard and mouse. Click information technology.
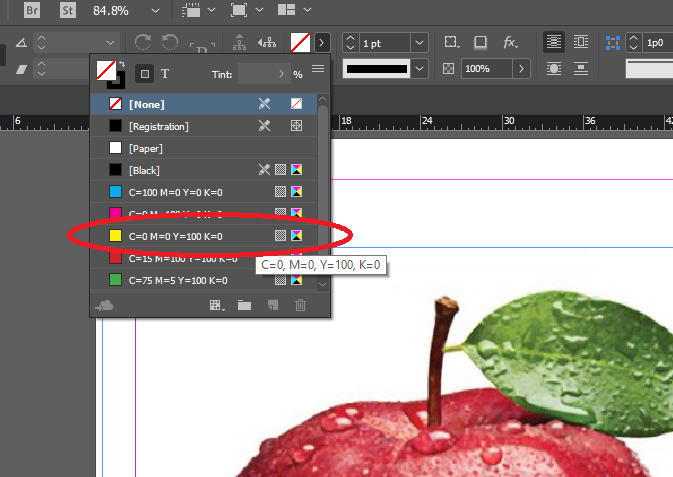
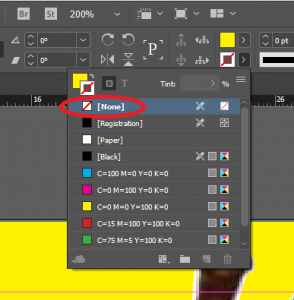
Direct yourself to the part of the screen circled in Figure four. The default stroke for an object is black. The default is No make full. We desire to change this to xanthous fill.
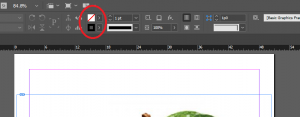
Click on the upper square and click any color to change the make full color.
Now we can make a yellowish rectangle.
Type M to bring upwardly the rectangle tool and then click the peak-left corner of the certificate, drag to the bottom-correct corner of the document, and then release the click. The whole certificate will now exist yellow.
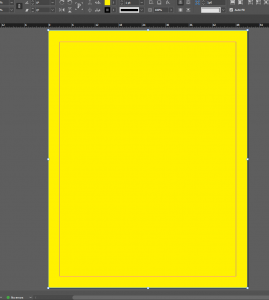
There's one problem–the apple is now obscured from view.
Merely no worries, just place the yellow rectangle beneath the image of the apple tree by selecting the yellow rectangle (Type V and the click on information technology) and then hit the CTRL key and the [ key at the same fourth dimension.
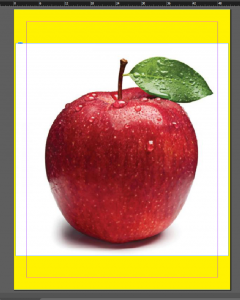
Next, select the image of the apple tree, or brand sure it is selected.
From there, click Object at the pinnacle of the window, then click Clipping Path, and so click Options.
Alternatively, you lot tin can hit the keys Ctrl-Alt-Shift-K simultaneously.
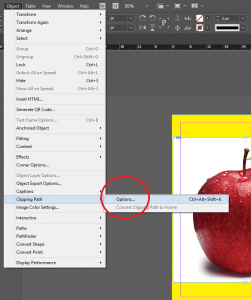
A "Clipping Path" window will come up. Change the Type to Detect Edges, and and so click OK.
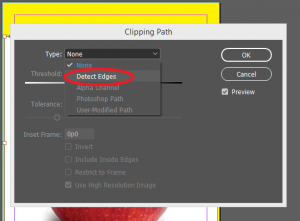
Y'all will have noticed 2 changes.
Outset, the apple volition exist larger than before.
Second, about–but not all–of the white background will take disappeared.
We are primarily left with the white around the shadow, and the white in between the stem and the leaf.
Now that nosotros have used clipping path to detect edges we can movement on to the fine-tuning.
Nosotros showtime want the whole apple in view, as some of it disappeared beyond the image'south extents when it enlarged.
Simply click the white rectangle circled in Figure 10, and drag it upward to the top of the document.
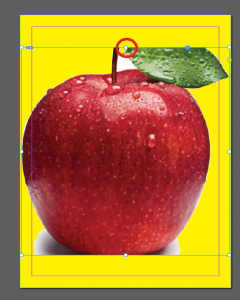
Now that nosotros can see the whole apple tree once more, permit's fine tune.
There are several methods to getting rid of the white, just the simplest method here is to create a yellow overlay.
Select the Pen tool (Type P), and use it to make an outline of the white in between the leaf and the stalk.
You make accept to zoom in a few times (Ctrl++) for more accuracy.
For newcomers to Pen tool: When using the Pen tool, clicking adds an ballast signal, and holding a click and dragging creates a bend. Later making a curve, you want to click the ballast point you just made Earlier adding another anchor point.
Spend fourth dimension familiarizing yourself with the Pen tool as needed.
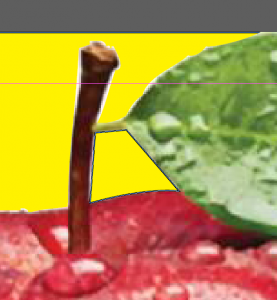
Information technology has a black edge. But we can change that by changing the Stroke colour to No fill.
Nosotros can practice the aforementioned thing for the bottom of the cartoon, including the shadow.
This is i of those things that tin examination your patience but is nevertheless skillful to stick to.
It looks pretty good now.
The trouble is that if the apple tree is moved, the overlays won't motility with it.
We need to group them. Holding down the SHIFT cardinal, select the ii yellow overlays and the apple and then type Ctrl+G to make the objects into a group.
We're non washed yet.
If y'all zoom in on the stem, you will meet there is withal some white effectually it.
This brings u.s. to another method of removing extraneous white from an image–deleting anchor points. Make certain the apple is selected, double-tap it, and so hit the "–" key on your keyboard to bring up the Delete Anchor Bespeak tool.
You should at present see the anchor points all around the apple tree.
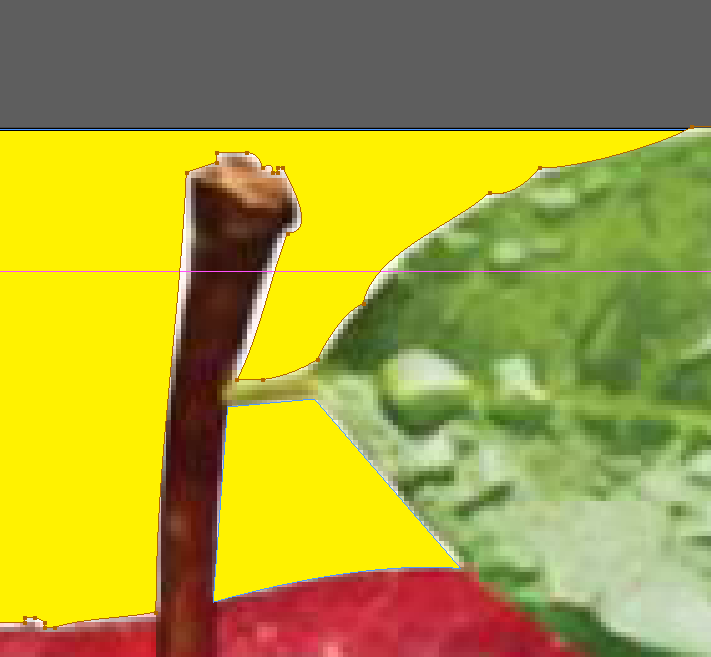
Click on anchor points to delete them, Hold the Alt key and click anywhere to add anchor points, and Ctrl click on whatsoever anchor point to move it.
It tin can be a fiddley chore, but the longer you play around with these options, the more perfect your paradigm will be.
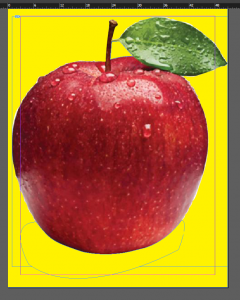
This is my final result…
…And this is how the image looks after existence exported:

The more you work on information technology, the improve you volition exist.
Information technology is not really noticeable without zooming in, but in that location is all the same a little bit of white on the leaves, as well as on the left side of the apple tree.
If y'all'd like more practice with the pen tool, you can see how perfect you can get the drawing.
If you want to expand your toolset further, read our Guide To Using Master Pages In InDesign. and our guide to tables in InDesign.
Determination
Mastering your command over the images you employ in Adobe InDesign will brand you a more than competent user no matter what you use the software for. Flexibility is key to mastering InDesign, and we hope this guide has comprehensively covered how you can remove a background from your images.

Source: https://www.acuitytraining.co.uk/news-tips/indesign-remove-white-background-picture/
Posted by: byrnehapingrese1948.blogspot.com
0 Response to "How To Make Background Transparent In Indesign"
Post a Comment